Web apps + Sharepoint
What are the advantages in integrating your web app with MS Sharepoint?
No need to spend on storage or pay for data transfers.
No need to think about backups or access permissions.
Delighted users, because everything is in one place.
Nothing to locate, copy or sync.
These benefits also apply to other cloud files providers of course.
The actual APIs will be different, the concepts introduces here apply to any provider.
Users
Case-worker user needs quick access to files related to a case.
Manager who oversees multiple cases within a region.
Teacher who needs access to lesson content.
Care-taker who wants to upload photos from activities.
Salesman/saleswoman who needs wishes to consult product documentation or start a product presentation.
User needs
All of these users need access to their files and would prefer to
- Find documents related to an activity, directly when working with the app. Like files related to a case.
- Preview and download related documents. Documents that are relevant to the current app context (place).
- Upload documents and photos from the app. Don't make users search for the correct location in another app. Chances are, they just won't bother.
- Organize documents into folders and rename files and photos.
- Edit and organize files on their pc/mac and sync to the cloud. Of course this feature is provided by MS Sharepoint out of the box.
Obviously the common thread here is to have the right set of files available depending on the app context. In other words, what the user is looking at in the app.
Options
The simplest solution is to have a Sharepoint file-path associated with each app record (like a case or activity or product).
Depending on your needs you might want to have a recursive strategy. Where files related to a case are stored under a folder with the name of the case, within a folder with the client’s name.
For some situations a single folder is not flexible enough. In this case, you can associate multiple folders, or even files with a record directly. (For example add an document_location table with record_id and sharepoint_path columns to your DB.)
Maybe in the future microsoft will provide a more flexible metadata model, so that we can put tags on files. There is some experimental api available here.
Implementation
Let me show you some javascript code for listing downloading and uploading to Sharepoint.
We shall go with the simplest solution where we construct a sharepoint folder path database record data.
For each case we will build the path /cases/<caseid> and use it as the file location.
You will have to add a drives prefix, depending on where your shared list will live.
Authentication
First of all we have to authenticate. To make the integration seamless for the user, it is best yo avoid too many login screens. When our app users have Sharepoint access it is very likely they are azure ad users. Take a look here on how to create federated (Oauth) login via Azure AD.
Another alternative is to have a “service” user for Sharepoint login. If you go down this route, keep in mind that you will loose metadata information, like which user access or modified which file (in Sharepoint. In your app, you can keep track of the operations.). This approach is best reserved for light and/or readonly access.
Let's add an API to our NodeJS backend to get token that will allow us to call Sharepoint APIs.
app.get("/api/azure/accesstoken", mustAuth, async (req, res) => {
	try {
		const user = req.user as IUser;
		const refreshToken = user.refreshToken;

		const body = new FormData();
		body.set("client_id", "");
		body.set("client_secret", "");
		body.set("resource", "https://graph.microsoft.com");

		// user has no access token, use the shared one.
		if (refreshToken) {
			body.set("grant_type", "refresh_token");
			body.set("refresh_token", refreshToken || "");
			body.set("scope", "Sites.ReadWrite.All Files.ReadWrite.All OneDrive.Read.All Calendars.Read.Shared");
		}
		else {
			const serviceUser = getSharepointServiceUser();
			if (serviceUser) {
				if (serviceUser.password) {
					body.set("grant_type", "password");
					body.set("username", serviceUser.name);
					body.set("password", serviceUser.password);
				} else {
					body.set("grant_type", "refresh_token");
					body.set("refresh_token", serviceUser.refresh_token);
				}
				body.set("scope", "Sites.ReadWrite.All Files.ReadWrite.All OneDrive.Read.All");
			} else {
				res.status(401).send("NOT AUTHORIZED");
				return;
			}
		}

		var tokenInit: RequestInit = {
			method: "POST",
			body: body,
		}
		const response = await fetch("https://login.microsoftonline.com/common/oauth2/token", tokenInit);
		const json = await response.json();
		if (refreshToken && json.refresh_token) {
			user.refreshToken = json.refresh_token;
		}
		res.json(json);
	}
	catch (e) {
		res.status(500).send("ERROR: " + e);
	}
});
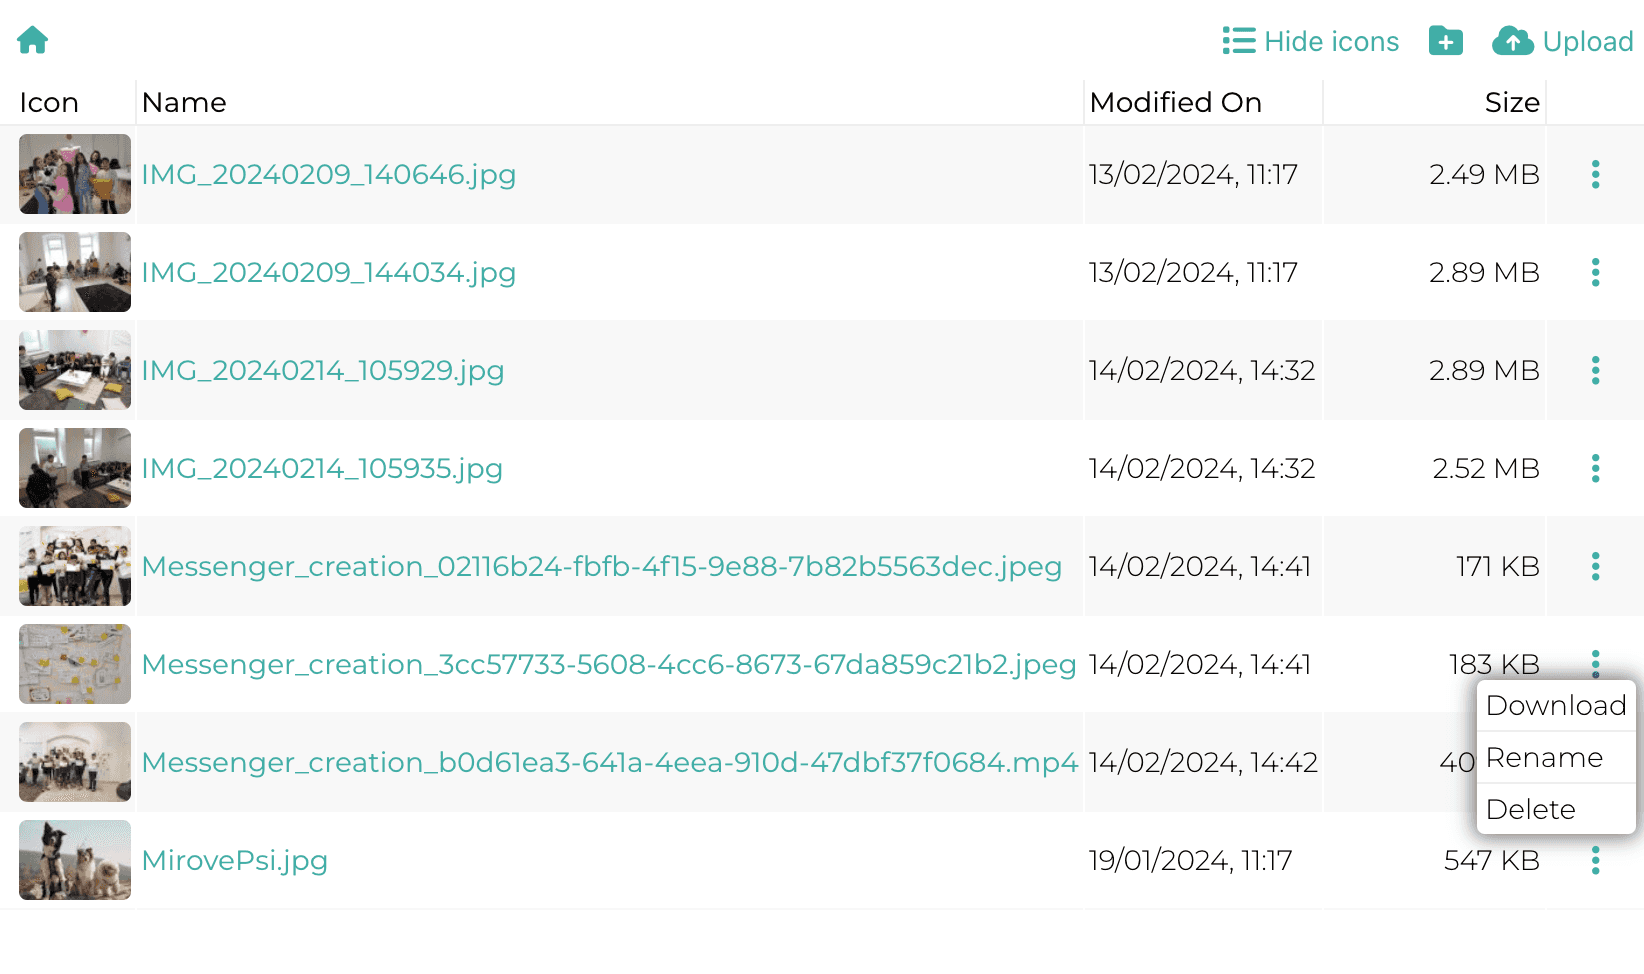
List files
Getting a list of files within a folder (with thumbnails!) is very straightforward.
The great thing about the Sharepoint APIs, is that the endpoint works in cross-origin mode. Therefore we can list files from javascript in the browser directly!
First I want to introuce a common api call method, used by all following methods.
export const executeGraphRequest = async (access_token: string, request: string, method: string = "GET", body?: any, headers?: any) : Promise<string> => {
	return new Promise((res, rej) => {

		var createCORSRequest = function (method: string, url: string) {
			var xhr = new XMLHttpRequest();
			if ("withCredentials" in xhr) {
				xhr.open(method, url, true);
			}
			return xhr;
		};

		var url = "https://graph.microsoft.com/v1.0/"+request;
		method = method || "GET";
		var xhr = createCORSRequest(method, url);

		xhr.onload = function () {
			const text = xhr.responseText;
			if (xhr.status >= 400) { // 404 not found or 500 errors
				rej(new Error(text));
			}
			res(text);
		};

		xhr.onerror = function () {
			const text = xhr.responseText;
			rej(new Error(text));
		};

		try {
			xhr.setRequestHeader('Authorization', "Bearer " + access_token);
			if (headers) {
				for (let kv of Object.entries(headers))
					xhr.setRequestHeader(kv[0], kv[1] as string);
			}
			if (body)
				xhr.send(body);
			else
				xhr.send();
		}
		catch (e) {
			rej(e)
		}
	})
};
To get a list of files we just call the method above like this.
const listFolder = async (access_token: string, path: string, options?: string): Promise<any[]> => {
	let q = path + ":/children";
	if (options)
		q += options;
	try {
		const t = await executeGraphRequest(access_token, q);
		const json = JSON.parse(t);
		const items = (json.value as any[]) || [];
		return items;
	}
	catch (e) {
		console.log(e);
	}
	return [];
}
The options parameter to the function above, allow us to request additional information about files.
To get thumbnails (icons) links for files, just pass: "?$expand=thumbnails".
Checkout Sharepoint thumbnail documentation section for more possibilities like different thumbnail sizes.
Standard 404 error is raised if the path does not exists.
Let's look at what the API will return and transform it into something suitable for display.
interface IFileInfo {
	name: string;
	id: string;
	isFolder: boolean;
	childCount?: number; // number of files in a folder
	modifiedon: string; // ISO date string
	size?: string;
	fileUrl?: string; // download url
	iconUrl?: string; // thumbnail, not available for folders!
}

const listFilesFromPath = async (path: string) => {
	const files: IFileInfo = [];

	const token = await fetch("/api/azure/accesstoken");
	const j = await token.json();
	access_token = j["access_token"];

	const displayOptions = "?$expand=thumbnails";
	const path = "my_folder_path";
	const items = await listFolder(access_token, rootFolder + (path ? "/" + path : ""), displayOptions);
	for (const item of items) {
		files.push({
			name: item.name,
			id: item.id,
			isFolder: item.folder !== undefined,
			childCount: item.folder && item.folder.childCount,
			modifiedon: item.lastModifiedDateTime,
			size: item.size,
			fileUrl: item["@microsoft.graph.downloadUrl"],
			iconUrl: item.thumbnails && item.thumbnails[0]?.small?.url
		});
	}

	return files;
}
Downloading files
Nothing could be simpler. The Sharepoint folder listing API returns a link. Just point the browser to that url and download will start.
const downloadFileUrl = (dataUrl: string, fileName: string) => {
	const a = document.createElement("a");
	a.href = dataUrl;
	a.download = fileName;
	document.body.appendChild(a);
	a.click();
	setTimeout(function () {
		document.body.removeChild(a);
	}, 0);
}

const downloadFile = (file: IFileInfo) => {
	downloadFileUrl(file.fileUrl, file.name);
}
Uploading files
As a minimum we want an upload button. But drag&drop is also nice and expected by more advanced users.
Additionally, copy paste might also work but only with images.
Upload button handler code with modern browsers is quite simple.
For compatibility you can also go with a normal hidden <input type='file'/> element and just call it's click method.
const uploadFilesButtonClick = () => {
	const input = document.createElement("input");
	input.setAttribute("type", "file");
	//input.setAttribute("accept", ".jpg"); // pass extension and mime types separated by ',' if you need to limit the type of files.
	input.setAttribute("multiple", "");
	input.addEventListener("change", () => {
		if (input.files && input.files[0]) {
			uploadFiles(input.files)
		}
	});
	input.showPicker();
}
Drag and drop is quite similar. Just don't forget the dragOver method, or nothing will happen.
const onFileDragOver = (event: any) => {
	// Must be called, otherwise drop is ignored!
	event.preventDefault();
}
fileListDiv.addEventListener("dragover", onFileDragOver);
Now drop it like it's...
const onFileDragDrop = async (event: any) => {
	// Prevent default behavior (Prevent file from being opened)
	event.preventDefault();

	let files: File[] = [];

	let items = event.dataTransfer.items;
	if (items) {
		for (let i = 0; i < items.length; i++) {
			const item = items[i];
			if (item.kind === "file") {
				const file = item.getAsFile();
				if (file) {
					files.push(file);
				}
			}
		}
	} else {
		const ff = event.dataTransfer.files;
		if (ff) {
			for (let i = 0; i < ff.length; i++) {
				files.push(ff[i]);
			}
		}
	}
	uploadFiles(files);
}

fileListDiv.addEventListener("drop", onFileDragDrop);
Let's write some common code, called by upload-button and drag&drop.
It will show a wait screen and upload each file in turn.
const uploadFiles = async (files: File[]) => {
	if (files && files.length > 0) {
		const info = { title: "Uploading...", subTitle:"" };
		const waitDialog = showWaitDialod(info); // todo: implement your own logic here.

		try {
			const folderPath = getCurrentFolderPath(); // todo: implement your own logic.
			for(const f of files) {
				const path = folderPath + f.name;
				waitDialog({ ...info, subTitle: f.name }); // update upload dialog.
				await uploadSmallFile(access_token.current, rootFolder + path, f);
			}
		}
		catch (e) {
			alert(e);
		}
		finally {
			waitDialog(null); // closes the dialog
		}
		// reload-folder
		//loadFolder();
	}
}
The actual upload API is almost comically straightforward.
However, keep in mind that this only works for relatively small files (less than 4MB).
For larger files, please consult the documentation here.
const uploadSmallFile = async (access_token: string, path: string, file: any): Promise<string> => {
	const headers = { "Content-Type": "application/octet-stream" };
	return executeGraphRequest(access_token, path + ":/content", "PUT", file, headers);
}
Creating a folder
Easy as 1, 2, 3.
const createFolder = async (access_token: string, path: string, name: string) => {
	const data = JSON.stringify({
		"name": name,
		"folder": {},
		"@microsoft.graph.conflictBehavior": "rename"
	});
	const headers = { "Content-Type": "application/json" };
	return executeGraphRequest(access_token, path + ":/children", "POST", data, headers);
}
Fun fact. Any parent folders missing are created automatically. This applies to file upload as well.
Delete and Rename
Delete is a one-liner.
const deleteFile = async (access_token: string, path: string) => {
	return executeGraphRequest(access_token, path, "DELETE");
}
Rename is a two-liner.
const renameFile = async (at: string, path: string, name: string) => {
	const data = JSON.stringify({"name": name });
	return executeGraphRequest(at, path, "PATCH", data, { "Content-Type": "application/json" });
}
_
Sharing is caring
I believe that automating what can be automated is the hallmark of great user experience.
Integrating files into your app is exactly that.
Users no longer have to switch between apps, and look for relevant data or files.
Integration will increase user engagement, making it more likely docs or photos actually get uploaded!
It will reduce errors, because data is uploaded to the right place.
And I believe, that by removing manual cumbersome steps, it will make your app popular with your users.
Happy hacking!
Continue reading
Sepa mass payment ISO20022


QR codes are a great way to quickly create a single bank payment. But what if you need to create multiple payments and regularly? There is a file format standard for that! Let’s look at how to build Sepa mass payment.
Making Addresses Work


There are many reasons to visit a client. Whether it is for therapy, for sales or for delivery, the journey cannot start without an address.
SQL OR condition on joins


Queries with OR conditions are notorious for being hard to make fast.
Avoid them if you can, read on if you cannot.