Customizing reports in Odoo
Sadly printing on dead trees or PDFs is still a thing in 2024. Luckily Odoo comes with pre-built reports for many possible scenarios. Whether we need to print a purchase order, a quote, an invoice, there is a report for that. Usually they only need a small adjustment, a field here or there, to make them fit our need. Read on, to see how to achieve that.
Reports Overview
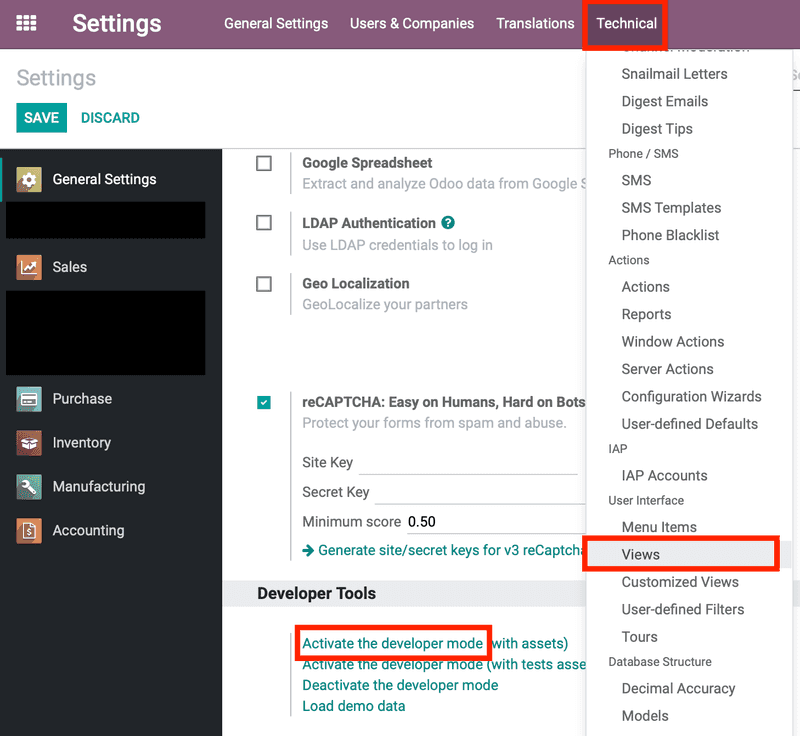
Reports are special view types called qweb and you’ll find them under views. Similarly to other view types, apps and plugins can add new reports or adjust existing.
Usually you can guess what report is used from its name or the name of the object. There is also a simple trick.
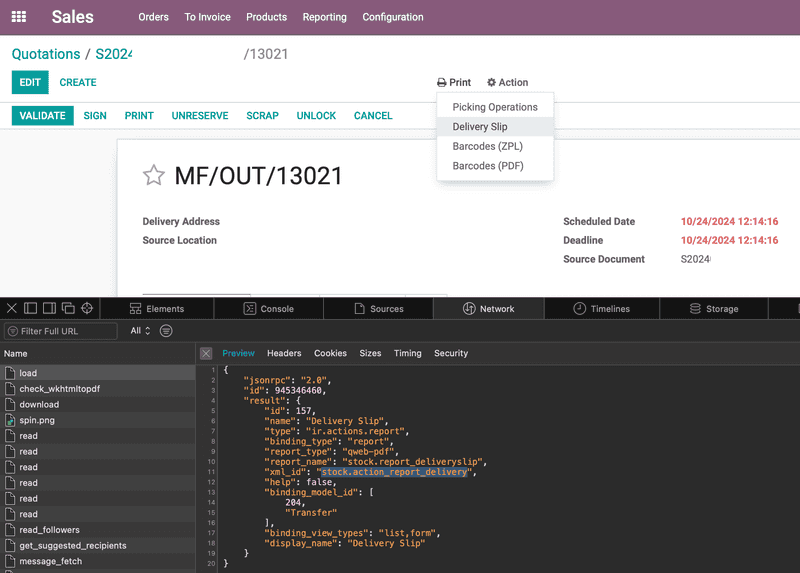
- In chrome open odoo on the record where you want to run (Print) a report
- Open the chrome webtools on network tab
- Run the report
- Look for the first load request and read the report name from report_name:)
Report basics
Internally an odoo report is a xml document. If you open one, it should look familiar, it is actuall mostly HTML! That's right, Odoo uses an HTML document as the report skeleton and the CSS language to design it.
To create a new report we need to make an xml file report_delivery_document_inuko.xml with this content
<?xml version="1.0" encoding="utf-8"?>
<odoo>
	<template id="report_delivery_document_inuko">
	<!-- actual report content-->
	</template>
</odoo>
However, sometimes we only want to extend an existing report. It would be a huge waste of time and a maintenance nightmare if we had to completly replace the existing report. Instead Odoo allows us to create an inherited report.
<template id="report_delivery_document_inuko" inherit_id="stock.report_delivery_document" priority="51">
 <!-- actual report content-->
</template>
What we are telling Odoo is, run our report before the stock.report_delivery_document. If there are multiple inherited reports the priority let's us tell Odoo how soon or late ours should run.
We will explore what it means to run an inherited report and how it is combined with the base report down bellow.
Report language
But how does Odoo insert the Odoo record data (fe. invoice and invoice-lines) into the HTML document?
This is done using the t-tags.
We recommend that you loot into the Odoo documentation for more indepth information. We will only cover the basics here.
In the simplest form we can tell the Odoo reporting engine to use a field from our record using the t-field.
<span t-field="o.name"/>
For a slightly more complicated output, we can use t-out.
<p><t t-out="value"/></p>
We can also do more complex things, for example conditional rendering with t-if. The actual condition is a Python expression.
 <t t-if="object.name">
    invoice <span t-out="object.name or ''"></span>
</t>
<t t-else="">
	invoice
</t>
If we have a list of things we want to render we can use the loop construct t-foreach.
<p t-foreach="[1, 2, 3]" t-as="i">
    <t t-out="i"/>
</p>
With the result being rendered as
<p>1</p>
<p>2</p>
<p>3</p>
Odoo also allows us to create and set variables within the report. Be careful with the variable names, because a t-set
will either assign an existing or create a new variable!
<t t-set="existing_or_new_variable" t-value="1 + 2"/>
The t-value can be an arbitrary python expression, and you can also use previously defined variables too.
Finally a directive you will encounter is the t-call tag. This allows us to include another reports output, inside the one we are making. Odoo uses this to create a common header/footer outside 'shell', before doing the actuall rendering.
Let's say we have an child-report
<p><t t-value="variable_passed_from_parent"/></p>
We can call the child-report like this
<t t-set="variable_passed_from_parent" t-value="1"/>
<t t-call="child-report"/>
That's it. There are of course a million details, but this should get you started.
Extending reports
Now the we know how to find the right Odoo report and how the report translation works, we can look into extending.
The whole magic is in the xpath element.
<xpath expr="" position="">
</xpath>
It has three parts,
- The
exprattribute, which is an xpath expression. - The
positionattribute, with values, Replace, Before, After. - The content of the element.
Let's look an example. We shall extend the stock.report_delivery_document report.
What happends is, Odoo will load the report as an xml document.
Then, it will look at the xpaths we have defined.
For each xpath, it will find all the element that match the expr in the xml document.
The depending on the position it will place the xpath content before, after or it will replace the matching element in the xml document.
Afterwards, the normal report template translation happens with the adjusted xml document. That is executing the t-tags generation of the html file etc.
Let's look at a more complete example. We want to put a different heading on the document, and we want to add a placeholder for signatures.
For the first part, we will look for the h2 tag and the divs with the name attribute of div_origin and div_sched_date.
The signature part is even simpler, we will locate the lines table with the name stock_move_line_table and add a section after it.
We only use a bit of style style="border-bottom:1px solid black;min-height:3em" to paint a line for the signature.
<template id="report_delivery_document_inuko" inherit_id="stock.report_delivery_document" priority="51">
	<xpath expr="//div[@class='page']/h2" position="replace">
		<h2>
			<span>Delivery Note: </span>
			<span t-field="o.name"/>
		</h2>
	</xpath>
	<xpath expr="//div[@name='div_origin']" position="replace">
		<div t-if="o.origin" class="col-auto" name="div_origin">
			<strong>Order:</strong>
			<p t-field="o.origin"/>
		</div>
	</xpath>
	<xpath expr="//div[@name='div_sched_date']/strong" position="replace">
		<strong>Delivery Date:</strong>
	</xpath>
	<xpath expr="//table[@name='stock_move_line_table']" position="after">
		<div class="row mt32 mb32" name="signatureTables">
			<div class="col-auto" name="signatureIssued" style="border-bottom:1px solid black;min-height:3em">
				<strong>Issued by:</strong>
				<div></div>
			</div>
			<div class="col-auto" name="signatureAccepted" style="border-bottom:1px solid black;min-height:3em">
				<strong>Accepted by:</strong>
				<div></div>
			</div>
		</div>
	</xpath>
</template>
Installing a report
To add a new or extended report to Odoo we will make a small package. This is a simple zip file with a few files.
First we need a description for what our package contains and information about the author, license and so on.
We put this info into the __manifest__.py file
# -*- coding: utf-8 -*-
{
    'name' : 'Inuko.net reports',
    'version' : '1.0',
    'summary': 'Inuko.net reports',
    'sequence': 10,
    'description': "This plugin contains a collection of reports",
    'category': 'Inventory',
    'author': "Inuko.net",
    'website': "https://www.inuko.net/",
    'maintainer': 'Inuko.net',
    'depends': [],
    'external_dependencies': {},
    'data': [
        'views/report.xml',
    ],
    'installable': True,
    'application': True,
    'auto_install': False,
}
Most of the file is self-explanatory. The important part is the data section that tells odoo what records we wish to install.
We will add a data directory to our zip file and inside we shall add the example report we made before
inuko_custom_reports.zip/data/report.xml
<odoo>
	<template id="report_delivery_document_inuko" inherit_id="stock.report_delivery_document" priority="51">
	<!-- content of the template from the previous section -->
	</template>

	<!-- We can add more templates here as needed. -->
</odoo>
Now that we have the package ready, we can add it to the addons folder in Odoo and install it. Our report is now ready.
Wrap
This was a high level introduction to Odoo reports. Our goal was to introduce the basic concepts and show you how things fit together. There are many more things to learn (translations, for example) and we will cover them in future blog posts.
Let us know, if there is a particular topic you would like to know more about!.
Happy hacking!


